Sunday, July 26, 2020

Spring Boot application - integration with Vault

Description

Vault is a very useful tool to store sensitive data in secure way. To get the data is necessary to pass thorough authentication process. Applications can get credential and certificates to DB, internal and external services,  file storages  etc. In addition Voult can encrypt data which could be store for example in DB (this case won't be checked in this post). 


In our common case we prepare simple application to grab sensitive information. We only put that data to the logger to check solution.


The Solution

Volt

Basic Vault server configuration is described at: https://spring.io/guides/gs/vault-config/. There exists important information such as Java version or path to the sources  (https://www.vaultproject.io/downloads).  It is recommended to add voult's path to the system variables. 

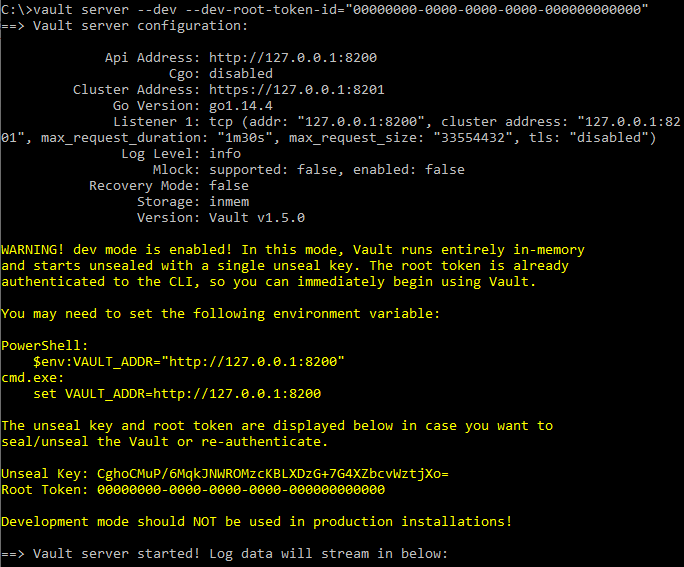
Lets start the Vault server:
vault server --dev --dev-root-token-id="00000000-0000-0000-0000-000000000000"  


Next lets add secrets:

vault kv put secret/artsci-vault-config artsci.username=artsciUser artsci.password=artsciPass


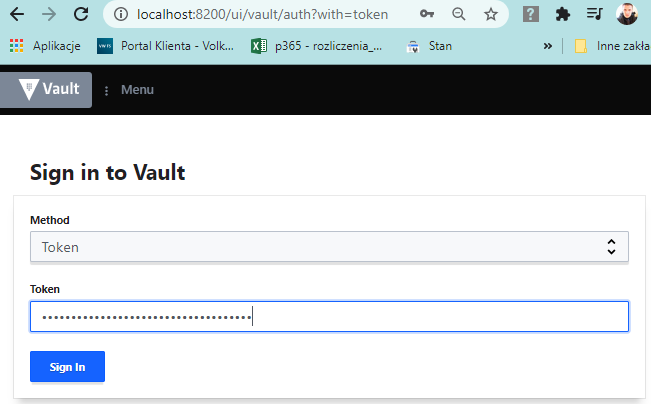
The same result we can see in web browser (http://localhost:8200/). It is necessary to use token we defined at the beginning
(00000000-0000-0000-0000-000000000000)


Then select 'secret' path:


And finally we can see previously created secret element.

 
As You can see everything is correct. You can manage this item. You  can create new version or delete this item.


Spring boot application

I created new application with configuration. Very important is bootstrap.properties file. That configuration is loaded at the beginning.  


 pom.xml

<project xmlns="http://maven.apache.org/POM/4.0.0" xmlns:xsi="http://www.w3.org/2001/XMLSchema-instance" xsi:schemaLocation="http://maven.apache.org/POM/4.0.0 https://maven.apache.org/xsd/maven-4.0.0.xsd">
  <modelVersion>4.0.0</modelVersion>
  <groupId>com.artsci</groupId>
  <artifactId>artsciVoultSpring</artifactId>
  <version>0.0.1-SNAPSHOT</version>
  <name>Voult client </name>
  
  
    <parent>
        <groupId>org.springframework.boot</groupId>
        <artifactId>spring-boot-starter-parent</artifactId>
        <version>2.2.1.RELEASE</version>
    </parent>

    <dependencies>

        <!-- Vault Starter -->
        <dependency>
            <groupId>org.springframework.cloud</groupId>
            <artifactId>spring-cloud-starter-vault-config</artifactId>
        </dependency>

        <dependency>
            <groupId>org.springframework.boot</groupId>
            <artifactId>spring-boot-starter-test</artifactId>
            <scope>test</scope>
        </dependency>
        
        <dependency>
    <groupId>org.projectlombok</groupId>
    <artifactId>lombok</artifactId>
    <version>1.18.12</version>
    <scope>provided</scope>
</dependency>
<dependency>
    <groupId>org.slf4j</groupId>
    <artifactId>slf4j-simple</artifactId>
    <version>1.8.0-beta4</version>     
</dependency>
        
    </dependencies>

    <dependencyManagement>
        <dependencies>
            <dependency>
                <groupId>org.springframework.cloud</groupId>
                <artifactId>spring-cloud-dependencies</artifactId>
                <version>${spring-cloud.version}</version>
                <type>pom</type>
                <scope>import</scope>
            </dependency>
        </dependencies>
    </dependencyManagement>

    <properties>
        <java.version>1.8</java.version>
        <spring-cloud.version>Greenwich.SR2</spring-cloud.version>
    </properties>

    <build>
        <plugins>
            <plugin>
                <groupId>org.springframework.boot</groupId>
                <artifactId>spring-boot-maven-plugin</artifactId>
            </plugin>
        </plugins>
    </build>
    
    <pluginRepositories>
        <pluginRepository>
            <id>central</id>
            <name>Central Repository</name>
            <url>https://repo.maven.apache.org/maven2</url>
            <layout>default</layout>
            <snapshots>
                <enabled>false</enabled>
            </snapshots>
            <releases>
                <updatePolicy>never</updatePolicy>
            </releases>
        </pluginRepository>
    </pluginRepositories>
    <repositories>
        <repository>
            <id>central</id>
            <name>Central Repository</name>
            <url>https://repo.maven.apache.org/maven2</url>
            <layout>default</layout>
            <snapshots>
                <enabled>false</enabled>
            </snapshots>
        </repository>
    </repositories>
</project>

bootstrap.properties

spring.application.name=artsci-vault-config
spring.cloud.vault.uri=http://localhost:8200
spring.cloud.vault.token=00000000-0000-0000-0000-000000000000
spring.cloud.vault.scheme=http
spring.cloud.vault.kv.enabled=true


VoltVariables .class

package artsciVoultSpring;

import org.springframework.boot.context.properties.ConfigurationProperties;
import lombok.Data;

@ConfigurationProperties("artsci")
@Data
public class VoltVariables {
private String username;
private String password;
}


ArtsciSpringVoultApp 

package artsciVoultSpring;

import org.slf4j.Logger;
import org.slf4j.LoggerFactory;
import org.springframework.boot.CommandLineRunner;
import org.springframework.boot.SpringApplication;
import org.springframework.boot.autoconfigure.SpringBootApplication;
import org.springframework.boot.context.properties.EnableConfigurationProperties;


@SpringBootApplication
@EnableConfigurationProperties(VoltVariables.class)
public class ArtsciSpringVoultApp implements CommandLineRunner  {
private final VoltVariables voltVariables;
public ArtsciSpringVoultApp (VoltVariables voltVariables) {
this.voltVariables = voltVariables;
}
public static void main(String[] args) {
SpringApplication.run(ArtsciSpringVoultApp.class, args);
}
public void run(String... args) {

    Logger logger = LoggerFactory.getLogger(ArtsciSpringVoultApp.class);

    logger.info("----------------------------------------");
    logger.info("Configuration properties");
    logger.info("Username: {}", voltVariables.getUsername());
    logger.info("Password: {}", voltVariables.getPassword());     
    logger.info("----------------------------------------");
  }
}

The Results

At the end we can compare properties in Voult and in application logs


So everything looks good. Variables are exactly the same :)

Tuesday, July 7, 2020

Kafka, Streams, Java producer and consumer

Kafka, Kafka Streams, Producer and Consumer

The theory

Apache Kafaka is high throughput integration system to pass through messages from source to target so Apache Kafka is a kind of pipeline.This is high level overview. Apache Kafka can work as a single instance or cluster of brokers which uses Zookepeer. The Zookeeper is responsible for store information about brokers node and topics. In addition it is new approach to integrate system. Base on Apache Kafka are built awesome projects like i.e.  Confluent  (https://docs.confluent.io/current/platform.html) which has many new connectors (JMS, MQTT, Cassandra, Solr, S3, DynamoDB, HDFS,..) and other elements: Kafka Connect, ksqldb, rest-proxy. Incoming streams can be filter or parse on-fly and results can be store in the destination place (DB, file store, ElasticSearch or other systems). For that purpose we can use Kafka Streams or KSQL. Each element are transported as a binary object and if producer and consumer wants to use complex structure of messages they should use external Schema Registry (it is also available in mentioned Confluent project).


Internally Apache Kafka contains topics and each topic has one or more partitions and replicas. As we can see below I prepare cluster draft which base on 3 brokers. There is a three partitions and each leader partition has got two additional followers. That configuration of Kafka cluster guarantee high durable and throughput. In case of damage one broker the other brokers handle events and automatically switch partition leader to another broker. Very important parameters are:
--replication-factor 3 --partitions 3   


The Producer

The Producer prepare message and put them to Kafka. Depends of acknowledge It can work in a few configurations:

  • acks - 0 >> No acknowledge is required
  • acks -1 >> Only partition leader acknowledge is required
  • acks -all >> Partition leader and partitions followers acknowledge is required

Throughput and duration depends on that configuration. If we aggregate application logs we can chose acks=0 (lost some part of data is not critical), but if we want to store business data we should consider acks=all (we must keep all data). 


Generally, producer should have got other properties like timeouts, retries, etc. It is also available to configure producer as idempotent producer (enable.idempotence=true). Kafka checks duplicates and potentially it could be higher latency.

In addition the producer can send a message:

  1. with defined key (spread across partition based on key hash ordering)
  2. without a key (spread across partitions with round robin approach) 


The Consumer

Kafka store data seven days (default). Each group receives data from topic from all partitions. The number of connection between consumer and partitions strictly depend on number of consumers in single group.


Delivery approach for consumers can be specified as:

  • at most one >> as soon as the data is received the offset commit is executed (possibility to lose data if consumer throw an error) 
  • at least once >> as soon as consumer finished processing the offset commit is executed (possibility to duplicate data - it is necessary to prevent that kind of situation)
  • exactly one >> this approach is dedicated for stream processing

The environment

Let's prepare environment with Apache Kafka. There is a few way but I choose Confluent project based on Docker. You can find documentation there: https://docs.confluent.io/current/quickstart/ce-docker-quickstart.html. Follow the steps and I'm sure You will have entire environment prepared to tests.

In that project is docker-compose.yml with definied serwers (below). There are very important configuration so If You want to change some variables, ports etc. this is the best place.
---
version: '2'
services:
  zookeeper:
    image: confluentinc/cp-zookeeper:5.5.1
    hostname: zookeeper
    container_name: zookeeper
    ports:
      - "2181:2181"
    environment:
      ZOOKEEPER_CLIENT_PORT: 2181
      ZOOKEEPER_TICK_TIME: 2000
  broker:
    image: confluentinc/cp-kafka:5.5.1
    hostname: broker
    container_name: broker
    depends_on:
      - zookeeper
    ports:
      - "29092:29092"
      - "9092:9092"
    environment:
      KAFKA_BROKER_ID: 1
      KAFKA_ZOOKEEPER_CONNECT: 'zookeeper:2181'
      KAFKA_LISTENER_SECURITY_PROTOCOL_MAP: PLAINTEXT:PLAINTEXT,PLAINTEXT_HOST:PLAINTEXT
      KAFKA_ADVERTISED_LISTENERS: PLAINTEXT://broker:29092,PLAINTEXT_HOST://localhost:9092
      KAFKA_OFFSETS_TOPIC_REPLICATION_FACTOR: 1
      KAFKA_TRANSACTION_STATE_LOG_MIN_ISR: 1
      KAFKA_TRANSACTION_STATE_LOG_REPLICATION_FACTOR: 1
      KAFKA_GROUP_INITIAL_REBALANCE_DELAY_MS: 0
...
...
After you run Confluent project you can see running servers


Let's connect to 'broker' server and create new 'artsci' topics from command line:
1. connect to 'broker' server


2. find main Kafka folder location


3. Create topic 'artsci' with 3 partition and 1 replication-factor (because maximum number of replication partition depends on brokers nodes)
kafka-topics --bootstrap-server localhost:9092 --topic artsci-topic --create --partitions 3 --replication-factor 1 

4. Let's find new topic 'artsci' in Confluent project web application (http://localhost:9021/)


The Producer application

To produce messages we can use CLI (kafka-console-producer --broker-list 127.0.0.1:9092 --topic artsci-topic --property parse.key=true --property key.separator=,)


To produce message we can use also Java application

pom.xml:
<project xmlns="http://maven.apache.org/POM/4.0.0" xmlns:xsi="http://www.w3.org/2001/XMLSchema-instance" xsi:schemaLocation="http://maven.apache.org/POM/4.0.0 https://maven.apache.org/xsd/maven-4.0.0.xsd">
  <modelVersion>4.0.0</modelVersion>
  <groupId>kafka.artsci</groupId>
  <artifactId>kafkaProducer</artifactId>
  <version>0.0.1-SNAPSHOT</version>
  <name>KafkaProducer</name>
  <description>KafkaProducer application in java</description>


  <dependencies>
     
<dependency>
    <groupId>org.slf4j</groupId>
    <artifactId>slf4j-simple</artifactId>
    <version>1.8.0-beta4</version>  
</dependency>
     
<dependency>
    <groupId>org.apache.kafka</groupId>
    <artifactId>kafka-clients</artifactId>
    <version>2.5.0</version>
</dependency>     
    </dependencies>

    <build>
        <plugins>
            <plugin>
                <groupId>org.apache.maven.plugins</groupId>
                <artifactId>maven-compiler-plugin</artifactId>
                <version>3.8.1</version>
                <configuration>
                    <source>1.8</source>
                    <target>1.8</target>
                </configuration>
            </plugin>
        </plugins>
    </build>

</project>

Java class:

package kafkaProducer;


import java.util.Properties;

import org.apache.kafka.clients.producer.Callback;

import org.apache.kafka.clients.producer.KafkaProducer;

import org.apache.kafka.clients.producer.ProducerConfig;
import org.apache.kafka.clients.producer.ProducerRecord;
import org.apache.kafka.clients.producer.RecordMetadata;
import org.apache.kafka.common.serialization.StringSerializer;
import org.slf4j.Logger;
import org.slf4j.LoggerFactory;

public class ArtsciKafkaProducer {
private static final String kafkaServer = "127.0.0.1:9092";
private static final String topicName = "artsci-topic";
private static final String ALL = "all";
private static final String TRUE = "true";
private static final String MAX_CONN = "5";
static Logger log = LoggerFactory.getLogger(ArtsciKafkaProducer.class.getName());
public static void main(String[] args) {
log.info("Start");
KafkaProducer<String, String> producer = createProducer();
ProducerRecord<String, String> rec = new ProducerRecord<String, String>(topicName, "key_101", "message 101");
producer.send(rec, new Callback() {
                   public void onCompletion(RecordMetadata metadata, Exception e) {
                       if(e != null) {
                          log.error("Error send message!",e); 
                       } else {
                        log.info("The offset of the record we just sent is: " + metadata.offset());
                       }
                   }
               });
producer.flush();
producer.close();
}
private static KafkaProducer<String, String> createProducer() {
log.info("Prepare Producer");
Properties prop = new Properties();
prop.setProperty(ProducerConfig.BOOTSTRAP_SERVERS_CONFIG, kafkaServer);
prop.setProperty(ProducerConfig.KEY_SERIALIZER_CLASS_CONFIG, StringSerializer.class.getName());
prop.setProperty(ProducerConfig.VALUE_SERIALIZER_CLASS_CONFIG, StringSerializer.class.getName());
prop.setProperty(ProducerConfig.ACKS_CONFIG, ALL);
prop.setProperty(ProducerConfig.ENABLE_IDEMPOTENCE_CONFIG, TRUE);
prop.setProperty(ProducerConfig.MAX_IN_FLIGHT_REQUESTS_PER_CONNECTION, MAX_CONN);
KafkaProducer<String, String> producer = new KafkaProducer<String, String>(prop);
return producer;
}
}


The Consumer application

To consume messages we can use CLI (kafka-console-consumer --bootstrap-server 127.0.0.1:9092 --topic artsci-topic --from-beginning --property print.key=true --property key.separator=,)


To consume messages we can use also Java application. 

pom.xml:

<project xmlns="http://maven.apache.org/POM/4.0.0" xmlns:xsi="http://www.w3.org/2001/XMLSchema-instance" xsi:schemaLocation="http://maven.apache.org/POM/4.0.0 https://maven.apache.org/xsd/maven-4.0.0.xsd">

  <modelVersion>4.0.0</modelVersion>
  <groupId>kafka.artsci</groupId>
  <artifactId>kafkaConsumer</artifactId>
  <version>0.0.1-SNAPSHOT</version>
  <name>KafkaConsumer</name>
  <description>KafkaConsumer</description>
  
  <dependencies>
        
<dependency>
    <groupId>org.slf4j</groupId>
    <artifactId>slf4j-simple</artifactId>
    <version>1.8.0-beta4</version>     
</dependency>
        
<dependency>
    <groupId>org.apache.kafka</groupId>
    <artifactId>kafka-clients</artifactId>
    <version>2.5.0</version>
</dependency>        
    </dependencies>

    <build>
        <plugins>
            <plugin>
                <groupId>org.apache.maven.plugins</groupId>
                <artifactId>maven-compiler-plugin</artifactId>
                <version>3.8.1</version>
                <configuration>
                    <source>1.8</source>
                    <target>1.8</target>
                </configuration>
            </plugin>
        </plugins>
    </build>
    
</project>

Java class:

package kafkaConsumer;

import java.time.Duration;

import java.util.Arrays;
import java.util.Properties;
import org.apache.kafka.clients.consumer.ConsumerConfig;
import org.apache.kafka.clients.consumer.ConsumerRecords;
import org.apache.kafka.clients.consumer.ConsumerRecord;
import org.apache.kafka.clients.consumer.KafkaConsumer;
import org.apache.kafka.common.serialization.StringDeserializer;
import org.slf4j.Logger;
import org.slf4j.LoggerFactory;

public class ArtsciKafkaConsumer {
private static final String kafkaServer = "127.0.0.1:9092";
private static final String topicName = "artsci-topic";
private static final String groupId = "artsci-consumer-group";
private static final String offset = "earliest";
static Logger log = LoggerFactory.getLogger(ArtsciKafkaConsumer.class.getName());
public static void main(String[] args) {
log.info("Start");
KafkaConsumer<String, String> consumer = createConsumer();
consumer.subscribe(Arrays.asList(topicName));
ConsumerRecords<String, String> records = consumer.poll(Duration.ofMillis(1000L));
for(ConsumerRecord<String, String> record : records) {
log.info("Receive record -> Key: "+record.key()+" value: "+record.value());
}
}
private static KafkaConsumer<String, String> createConsumer() {
log.info("Prepare Producer");
Properties prop = new Properties();
prop.setProperty(ConsumerConfig.BOOTSTRAP_SERVERS_CONFIG, kafkaServer);
prop.setProperty(ConsumerConfig.KEY_DESERIALIZER_CLASS_CONFIG, StringDeserializer.class.getName());
prop.setProperty(ConsumerConfig.VALUE_DESERIALIZER_CLASS_CONFIG, StringDeserializer.class.getName());
prop.setProperty(ConsumerConfig.GROUP_ID_CONFIG, groupId);
prop.setProperty(ConsumerConfig.AUTO_OFFSET_RESET_CONFIG, offset);
KafkaConsumer<String, String> consumer = new KafkaConsumer<String, String>(prop);
return consumer;
}
}

The output
[main] INFO kafkaConsumer.ArtsciKafkaConsumer - Receive record -> Key: key_2 value: message 2[main] INFO kafkaConsumer.ArtsciKafkaConsumer - Receive record -> Key: key_4 value: message 4[main] INFO kafkaConsumer.ArtsciKafkaConsumer - Receive record -> Key: key_5 value: message 5[main] INFO kafkaConsumer.ArtsciKafkaConsumer - Receive record -> Key: key_1 value: message 1[main] INFO kafkaConsumer.ArtsciKafkaConsumer - Receive record -> Key: key_3 value: message 3[main] INFO kafkaConsumer.ArtsciKafkaConsumer - Receive record -> Key: key_101 value: message 101

Links

https://kafka.apache.org/081/documentation.html
https://docs.confluent.io/current/quickstart/ce-docker-quickstart.html
https://docs.confluent.io/current/platform.html


Others subjects

Very important is security in Kafka cluster. Authentication and authorization for internally API between zookeeper and brokers and external for consumers API.

Sunday, June 28, 2020

CI/CD with Jenkins and Ansible on AWS

Objectives


Today I would like to show automation process CI/CD. Process starts from changes in source code trough the Jenkins scripts and ansible playbooks to the image repository and finally to the kubernetes cluster as a new pods and services. This post describes servers configurations, Jenkins configuration and ansible scripts. At the end of this post is verification of exposed service.


Configuration

Kubernetes cluster

Kubernetes cluster was created in my previous post: https://java-architect.blogspot.com/2020/06/how-to-create-ha-kubernetes-cluster-on.html. I'm going to used that cluster.

Jenkins server

We have a few automation servers to choose. There are tools like Jenkins, GitLab CI/CD, AWS CodePipeline. This time I choose Jenkins with pipeline. I have to mention I used configuration (subnet, VPC, etc.) from my previous post https://java-architect.blogspot.com/2020/06/aws-lambda-python-and-java.html

1. Create new security groups

aws ec2 create-security-group --group-name devOpsSg --description "DevOps security group" --vpc-id vpc-d70...
 The outcome:
{    "GroupId": "sg-0c3aa..."}

2. Add rules to previously created security group
aws ec2 authorize-security-group-ingress --group-id sg-0c3aa... --protocol tcp --port 22 --cidr 0.0.0.0/0
aws ec2 authorize-security-group-ingress --group-id sg-0c3aa... --protocol tcp --port 8080 --cidr 0.0.0.0/0
aws ec2 authorize-security-group-ingress --group-id sg-0c3aa... --protocol tcp --port 80 --cidr 0.0.0.0/0
3. Create EC2 instance for Jenkins server

aws ec2 run-instances --image-id ami-0a9e2b8a093c02922 --count 1 --instance-type t2.micro --key-name ArtsciKeyPairPPK --security-group-ids sg-0c3aa... --subnet-id subnet-7c... --tag-specifications 'ResourceType=instance,Tags=[{Key=NAME,Value=JENKINS}]' 'ResourceType=volume,Tags=[{Key=cost-center,Value=cc123}]'
The outcome configuration:
{

    "Groups": [],

    "Instances": [

        {

            "AmiLaunchIndex": 0,

            "ImageId": "ami-0a9e2b8a093c02922",

            "InstanceId": "i-01d560...",

            "InstanceType": "t2.micro",

            "KeyName": "ArtsciKeyPairPPK",

            "LaunchTime": "2020-06-23T14:06:51+00:00",

            "Monitoring": {

                "State": "disabled"

            },

            "Placement": {

                "AvailabilityZone": "eu-central-1b",

                "GroupName": "",

                "Tenancy": "default"

            },

            "PrivateDnsName": "ip-172-*-*-*.eu-central-1.compute.internal",

            "PrivateIpAddress": "172.*.*.*",

            "ProductCodes": [],

            "PublicDnsName": "",

            "State": {

                "Code": 0,
                "Name": "pending"
            },
            "StateTransitionReason": "",
            "SubnetId": "subnet-7c...",
            "VpcId": "vpc-d7...",
            "Architecture": "x86_64",
            "BlockDeviceMappings": [],
            "ClientToken": "3aee19....",
            "EbsOptimized": false,
            "Hypervisor": "xen",
            "NetworkInterfaces": [
                {
                    "Attachment": {
                        "AttachTime": "2020-06-23T14:06:51+00:00",
                        "AttachmentId": "eni-attach-0...",
                        "DeleteOnTermination": true,
                        "DeviceIndex": 0,
                        "Status": "attaching"
                    },
                    "Description": "",
                    "Groups": [
                        {
                            "GroupName": "devOpsSg",
                            "GroupId": "sg-0c3..."
                        }
                    ],
                    "Ipv6Addresses": [],
                    "MacAddress": "06:d7:...",
                    "NetworkInterfaceId": "eni-01d...",
                    "OwnerId": "920002511415",
                    "PrivateDnsName": "ip-172-*-*-*.eu-central-1.compute.internal",
                    "PrivateIpAddress": "172.*.*.*",
                    "PrivateIpAddresses": [
                        {
                            "Primary": true,
                            "PrivateDnsName": "ip-172-*-*-*.eu-central-1.compute.internal",
                            "PrivateIpAddress": "172.*.*.*"
                        }
                    ],
                    "SourceDestCheck": true,
                    "Status": "in-use",
                    "SubnetId": "subnet-7...",
                    "VpcId": "vpc-d...",
                    "InterfaceType": "interface"
                }
            ],
            "RootDeviceName": "/dev/xvda",
            "RootDeviceType": "ebs",
            "SecurityGroups": [
                {
                    "GroupName": "devOpsSg",
                    "GroupId": "sg-0c..."
                }
            ],
            "SourceDestCheck": true,
            "StateReason": {
                "Code": "pending",
                "Message": "pending"
            },
            "Tags": [
                {
                    "Key": "Name",
                    "Value": "jenkins"
                }
            ],
            "VirtualizationType": "hvm",
            "CpuOptions": {
                "CoreCount": 1,
                "ThreadsPerCore": 1
            },
            "CapacityReservationSpecification": {
                "CapacityReservationPreference": "open"
            },
            "MetadataOptions": {
                "State": "pending",
                "HttpTokens": "optional",
                "HttpPutResponseHopLimit": 1,
                "HttpEndpoint": "enabled"
            }
        }
    ],
    "OwnerId": "92...",
    "ReservationId": "r-02..."

So, we can check the status of created EC2 instance.


4. Check java version. It is necessary java v.8. If you install new java version You will need to apply new environment variables:  JAVA_HOME and set PATH (http://openjdk.java.net/install/)
 yum install java-1.8.0-openjdk-devel

5. Install jenkins server (follow the link https://pkg.jenkins.io/redhat-stable/)

sudo wget -O /etc/yum.repos.d/jenkins.repo https://pkg.jenkins.io/redhat-stable/jenkins.repo
sudo rpm --import https://pkg.jenkins.io/redhat-stable/jenkins.io.key
yum install jenkins
6. Run Jenkins server
service jenkins start
7. Unlock jenkins server. Read password from path /var/lib/jenkins/secrets/initialAdminPassword
and put it to the browser <IP_JENKINS>:8080. Then install recommended plugins


and next create admin account


8. Configure jenkins server

Add git
yum install git

and Maven (get and unzip to maven folder)
wget http://mirrors.estointernet.in/apache/maven/maven-3/3.6.3/binaries/apache-maven-3.6.3-bin.tar.gz
tar -xvzf apache-maven-3.6.3-bin.tar.gz -C /opt/maven/

Install plugins


Add missing environment variables using command: vi ~/.bash_profile

# User specific environment and startup programs
M2_HOME=/opt/maven/apache-maven-3.6.3
JAVA_HOME=/usr/lib/jvm/java-1.8.0-openjdk-1.8.0.252.b09-2.51.amzn1.x86_64
PATH=$PATH:$HOME/bin:$JAVA_HOME:$M2_HOME:$M2_HOME/bin

Add final configuration


Finally let's configure ssh connection to ansible server


Ansible server

1. Let's create new EC2 instance similar to previous section.

aws ec2 run-instances --image-id ami-0a9e2b8a093c02922 --count 1 --instance-type t2.micro --key-name ArtsciKeyPairPPK --security-group-ids sg-0c3aa... --subnet-id subnet-7c... --tag-specifications 'ResourceType=instance,Tags=[{Key=Name,Value=ansible}]' 'ResourceType=volume,Tags=[{Key=cost-center,Value=cc123}]'

2. Next install dockcer and ansible

yum install docker
pip install --upgrade pip
pip install ansible

3.  Create new user 'artsci' and add privileges and assign to selected group

useradd artsci
passwd artsci
usermod -aG docker artsci
add privileges 'artsci ALL=(ALL) NOPASSWD: ALL' to /etc/sudoers

4. Configure remote access using keys to the k8s cluster
Change file /etc/ssh/sshd_config (section -> # EC2 uses keys for remote access -> PasswordAuthentication yes)
ssh-keygen (as a 'artsci' user -> su - artsci)
  Your identification has been saved in /home/artsci/.ssh/id_rsa.
  Your public key has been saved in /home/artsci/.ssh/id_rsa.pub
ssh-copy-id artsci@<IP-k8s-cluster> (and copy it to the root)
Alternatively you can manually copy content of id_rsa.pub to authorized_keys on k8s server
You can check connection using: ssh -i /home/artsci/.ssh/id_rsa root@<IP-k8s-cluster>


5. Prepare folder to store created packages
mkdir /opt/cluster-k8s
chown -R artsci:artsci /opt/cluster-k8s

Execution

Jenkins server

Jenkins should have configuration to observe source code repository and build a war file and call ansible playbooks if some source code are marked as changed. Below is definition of process.


Ansible server

On ansible server I created playbook scripts to create docker images, save that images to dockerhub and finally deploy that images to kubernetes cluster.


Prepare the ansible-playbook script to create image and push it to the repository (ansible-build-image.yml):

---
- hosts: ansibleServer
  #become: true
  tasks:
  - name: create docker image (base on  war file)
    command: docker build -t artsci-simple-image:latest .
    args:
      chdir: /opt/cluster-k8s
  - name: add tag to image
    command: docker tag artsci-simple-image artsci/artsci-simple-image
  - name: push image to repository (dockerhub)
    command: docker push artsci/artsci-simple-image
    ignore_errors: yes
  - name: remove previously created images
    command: docker rmi artsci-simple-image:latest artsci/artsci-simple-image
    ignore_errors: yes
 

Prepare the ansible-playbook script to deploy previously created image to kubernetes cluster (k8s-deploy.yml)

---
- name: Create pods using deployment
  hosts: k8s-manageServer
  become: true
  user: root
  tasks:
  - name: create a deployment
    command: kubectl apply -f /opt/scripts/artsci-deploy.yml
  - name: add restart command
    command: kubectl rollout restart deployment artsci-deployment

Finally prepare script with kubernetes definition of deployment and service (artsci-deploy.yml)

apiVersion: apps/v1
kind: Deployment
metadata:
  name: artsci-deployment
spec:
  selector:
    matchLabels:
      app: artsci-simple-app
  replicas: 2
  strategy:
    type: RollingUpdate
    rollingUpdate:
      maxSurge: 1
      maxUnavailable: 1
  template:
    metadata:
      labels:
        app: artsci-simple-app
    spec:
      containers:
      - name: artsci-simple-app
        image: artsci/artsci-simple-image
        ports:
        - containerPort: 8080
---
apiVersion: v1
kind: Service
metadata:
  name: artsci-service
  labels:
    app: artsci-simple-app
spec:
  selector:
    app: artsci-simple-app
  type: LoadBalancer
  ports:
    - port: 8080
      targetPort: 8080
      nodePort: 32000


The outcome

After all Jenkins process all changes in git repository


Finally, call the exposed functionality of REST service:

curl --user "admin:admin" --request GET http://ec2-***.eu-central-1.compute.amazonaws.com:32000/artsci/hello
Hello Artsci! :)